.
. . . .

web'Galerie Voigt Edition

France F - 32320 Bassoues , Grande Rue
craftmanship blockletter printing collotype lithography gallery home

the collotype process next
introduction
usual transmission of ink
transmission characteristic of collotype
important printing parameters
actual limits
mathematical model
suitable printing-machines
your own start
the negative
making printing-plates
mechanism of exposure
watering the plates
preparing the printing
printing
hints for the paper
epilogue
appendix


measured values


variation of plate exposure or humidity


1. fixing layer , 2. printing layer , bichromate
suitable UV-lightsources , your own exposure
handeling the printing-plates
to wet the plate und preparing the ink


collotype printers , still printing colleagues
material , literature survey , my process parameters

.
introduction back next
This description of the collotype-process will give you a simple environment for your own start of collotype printing. Your benefit of my experience is this focus on the necessary components and actions wich brings you the certitude to proceed on your own way.

For the quantity of ingredients and treatments which are handed down, they're all possible. But if there's a fault in your process, it's better to know what cause engenders this effect to get a controlled impact as solid part of your own methodic work.

The first part of my work has been finding out the necessary components and their order of impact.

Knowing this context will help you to fix problems in a moderate lot of time. - without - you're often like a man in a boot thinking about how to fix this nasty wobbling horizont.

So it's better making a new printing-plate with the right light-exposure, than printing the wrong one with all tricky auxiliary means you can get.

If you like to look at the list of my parameters at the appendix and you can imagine how many series of tests it take to systematize things.

Take my best wishes on your way of collotype. You'll find, by the way, the respect for the attainment of our historical predecessors.

.
usual transmission of ink top back next
Traditional printing-machines normaly use inkrollers without lateral adherence. Such rollers will give half of the ink to next, new roller (or printing-plate) by dividing the inkfilm in two equal parts. This reproducible behaviour will be the condition for my further considerations.

On the other hand, the well trained artisan knews how to give more ink by retarding his inkroller and increasing pressure, ore taking the ink from the printing-plate with quick lightly touch of his inkroller. A good technique to improve the quality of handprinted collotypes, but not reproducible for this analysis.

.
transmission characteristic of collotype top back next
On conventional screen printing the transmission characteristic of the "life" continious tone is done by the ratio between the areas of printing and nonprinting elements. The printing-process itself shouldn't have any influence on the transmission characteristic except his two major faults - the inkfilm density and the geometric distortion of the printing elements.

The collotypeprocess use a range of surface tension to modify the thickness of the inkfilm. You can print continious tone without a screen this way. The transmission characteristic is an result of the surface tensions of printing-plate, ink and the printing speed. Each artisan of collotype is working on his own "iland", defined trough the right ratio of his components.
Mr. Lucas and our italian colleague remember this circumstance in our discussion about the "right" ink, which we orderd together from Huber in Munich.

Historic literature told us about collotype-wrinkles (cleary to be seen in the dark areas of the prints) as the only cause of transmission characteristic - that's fault. Those collotype-wrinkles causes not the primary transmission characteristic. They give information about the right temperature-regime while making the collotypeplate.
Printing the plate, you can use them with the right kind of "smooth" ink as "intaglio-part" in the dark areas. The real transmission characteristic depends on an asymetric splitting of the ink while inking the printing-plate, starting from zero in the highlights.

the graphic shows an example of a print inking the plate one time with a "normal" ink.

.

top back next

gemessene Kennlinie

.
important printing parameters top back next
The item "transmission characteristic" means only the behavior of the gelatine. Measuring the printed sheet you get the behavior of the paper als well in the absolut values.
The adoption of the ink by the paper, clearly to be seen in the dark parts, is mostly constant. Even in the values of gloss - densities above 1,3 - the gelatine transmission characteristic dominates. So it's possible to compare the normalized prints.

The important printing parameter in order of their impact:

The condition of the ink dominates the process and his description is the leading problem.

The printing speed is uncritical. You can ascertain it without difficlties.

The humidity of the plate is astonishing stable. The usual hygroscopic mixture of half water and half glycerin don't dry at a relative room humidity of 50-60 %.

Developing your own "standard"-ink is a great but good investigation of your time and an opportunity thinking about of what this ink should do.

For each condition of the ink creates a different transmission caracteristic on the same plate, you can print different scales from one plate adding them on your paper to get a wide range of continious tone.
In former times artisans use mainly two conditions of ink. One with "strength" to print the highlights and midtones and another "soft"-one for the shadows to be printed of the same plate.

The goal of my "standard"-ink: Showing the full range of the plate printing it one time.

.
actual limits top back next
The shadow-areas of the plate shouldn`t be dry. You need little humidity for ink-transfer.
The beginning of "blowholes" in the shadows of the print will cause a point of inflection in the transmission characteristic.
The maximal density without "blowholes" is the exposure-limit for the gelatine.

Printing the highlights requires much experience in ink conditioning. For the ink-film should go to zero and you'll see each trouble inhibiting this.
With less experience you can solve this problem by masking the border of your print while plate exposure or while printing.
.
mathematical model top back next
The following functional relation is usful to calculate the transmission characteristic of the collotype-process. You are able to factor in the relevant parameters and to normalize the output for comparison. The points of inflection shown under "actual limits" were not a part of this relation.

This function will make you controlling the print and gives you the data for your own optimal negatives.

D = S + ( Dmax / ( N + F * ND^Bel ) )

D
S
Dmax
N
F
ND
Bel
effective density output
haze in the highlights
your maximal print density
parameter to normalize
plate humidity
negativ density
plate exposure

The precise assignment to physical units will last more time to develope the suitable equipment for measuring the plate humidity and the ink condition.

The next both diagrams were showing the possibilities of modeling by the varation of "exposure" and plate "humidity" giving the impact to the transmission characteristic of collotype.

The line "modell" shows the approximation to the measured density values.
The line "Reihe2" give the measured values.
Line "modell2" to "modell6" gives an impression of parameter variation.
.

top back next

varation exposure

.

top back next

varation plate humidity

.
suitable printing-machines top back next
To make a first test, you can print by hand using a spoon e.g.. The paper should be not too heavy.

machines for etching
The process needs a high "line-pressure". My first etching-press with 30cm width and a cylinder of 40mm diameter each bearing got a pressure of 400kp.
The pressure-variation via the usual jackscrews are useful. Changing the material to distribute the pressure for the plate ( soft or hard ) is easy.
The only problem is the time the paper is in contact with the printing-plate. It will absorb too much water from the plate, so you had to water it more often.

blockletter machines
This type of cylinder-maschines got a constant distance between ptinting-cylinder and plate. That's why you must have a precise calibrated printing-plate. Even special mirror-glas is corrugated, you have to grind it before it's perfect to use.
A rubbersheet for the printing-cylinder is a useful compromise to protect a corrugated (glass)plate of destroying pressure-peaks.

Some blockletter machines got an adjustable seating for the plate level. This make those machines very useful for collotype printing. You can start with a low position and you can see what's up with your plate while printing.

The electric powered ink-roller of those constructions are to be used too long without printing, for after 3 minutes of rubbing ink you'll get a "new" ink condition for printing.
Printing in a permanent manner, ink-rubbing last only seconds. You can compensate ink condition from time to time.

You can compensate the "short" ink-roller of your "modern" machine (generally 2 pieces) by inking your plate twice for each print (old litho machines got up to 8 ink-rollers).

I use a blockletter machine for my collotype work.

machines for lithography
Old litho-machines are printing with a constant pressure, which will help printing of corrugated plates. New constuctions with hydraulic controller should do it in a comparable way.

Boston
May be useful for smaller sheets. For the pressure must be enough for the whole surface.

offset machines
Our test with a small offset machine (1000 - 6000 U/min) is stopped. Coating aluminium-plates is no problem, but transfering ink with a rubbersheet is not easy printing continious tone.

.
your own start top back next
You can't standardize The transmission characteristic of collotype bindingly.
Each collotype-printer must workout for his printing-speed a set of making plates, watering plates and ink condition and measure the existing transmission characteristic. The negativ for the exposure must follow this function to make a right balanced print.
This requires a steady feed back from printing results to the darkroom.

To get process-controll I'm generally printing two gray-scales. The first is taken by making the reproduction of the original. This will controll darkroom-work and final print comparison. The second with equal steps shows the transmission characteristic of the gelatine.

First you had to find the right plate-exposure and an useful ink condition. If you use a simple negativ with a densityrange from 0,6 to 1,0, it's not so hard to get a reasonable print.

Getting more experience you can increase the densityrange of your negativ to get a better print. Doing this you'll see the difference resulting from the nonlinear collotype transmission.

In field of historic collotype not the printer - the man who does the retouching was the real artist.
Therefore the second goal of my work is to disentangle the collotype process from this manual "key"-skills.

The collotype-printer can use this process in two ways
1) artistic - inking the plate by hand visually controlled similar to oilbrom-print.
2) as craftsmen - making a reproduction under controlled conditions

.
the negative Seitenanfang zurück vorwärts
Printing collotype is easy , if the negative obtains the whole character of your printingplate.
In former days all correction of the negative where done by hand under visual control.
This important knowledge where only imparted verbally and one must have much practice to perform this craftmanship.

Using the mathematical model of the density-transferfunction, which I have created , one can calculate the gradient
of the target-negative for his own working conditions and make it without any retouching.
Working this way one can use all known photographic processes for upgrading a printed image and doing colorseparation.

These technologies have nothing to do with collotype , so please refer to their specific manuals.

Additional to the many photo-sites in the net - one hint to make negatives with absolut denisities you desire in an efficient way.

There are two basic points to control the workflow of making films:
- the gradiation of the density is a result of development
- the developertype and filmcombination determines the scope of gradients
- the time of development establishes the detailed value of gamma *.

In this way one can fit the densityrange of the original to the range of the printingplate.

Variation of exposuretime makes a parallel transition of the densitycurve , a simple way to get the desired density-values.
While gamma is constant the existing density-difference gives you the new value for the exposuretime.
So you need at most one test to get an perfect result.

* How to get the time for development to have your desired gamma:
- get the scope of gradients for your film from the producers data-sheet.
- you can exchange the mentioned developer with your favorite of the same type.
- Between development-time and gamma there's an logarithmic relation.
- if you draw a gamma/time chart give the timeline an logarithmic scale ,
so you'll get a line for the function.
gamma / time
Making two test-developments e.g. 3 min and 10 min you have two points to draw the line which helps you to identify all the other gamma/time values.

For to work in this systematic way , I stabilize all the other parameters of development:
- an temperature regulated developer / a simple two-level controller is adequate
- fresh onetime developer / heavy diluted it makes long development-times
- a development-machine / I use an simple roller-machine

The time for changing the liquid content of the drum dosen't matter if developmenttime is greater then 3 minutes.

different drums - different results ?
The fluid level in the drum determines the relation between the filmparts under developer and to be free at the circumference of the drum.
This relation must be equal for all kind of drums been used. The developervolume depends on the fluid level for this specific relation.

In my experience Flow path developer-machines with or without developerregeneration are not useful to create reproducible halftone films.

.
making printing-plates top back next
Your own machine makes the decision clear, what kind of printing-plate you'll use. I prefere plates with a reproducible coating. Films and metalfoil do this only the first time, so the're for single use only.

Most of the machines for hand-printing do have a flat seating, thats why glass is a solid base for continuous usage.
Special "mirror"-glass is corrugated like normal window-glass, but more expencive. So you had to grind your plates anyway, normal glass up from 4mm will do - 6mm is optimal.

Grinding two plates each on another like lithostones in circles without any pressure. Having done a small quantity of corundum and water on the lower plate and moving the upper plate. A grain of 240 will result a good surface and a desirable working effort. A grain of 80 make a poor surface and a grain of 360 is running dry in short time.
Grinding each time the plates 30 minutes regardless of the result and not grinding the same plates a second time together, will give you perfect plates after some working-cycles.
If you abtrade the old gelatine-coating with a sharp knife bevor gringing, you don't have to etch it away.

Plattenschleifmaschine

My grindingmachine is based on an old windscreen wiper used in cars. It works without problems over the years for all sizes of my plates.

.
1. fixing layer top back next
This praeparation should improve the adhesion of gelatine on glass - coating as thin as possible.
formula
350 ccm
35 ccm
100 ccm
0,5 - 1 ccm
1. praeparation
distilled water
sodium silicate
albumin
ammonia

production:
Add ammonia to the egg-white and wipe to stiff foam. Give now one day to separate the albumin. Mix distilled water with the sodium silicate and add only the fluid albumin. Filter it trough a normal wet coffee-filter.
(coffee-filter usually have 50um pores - a wet filter will not clog up in a short time)

coating:
e.g. for a size of 30x40cm. Take the plate on your fingertips. Pouring ca. 40ccm in the middle of the plate. Give the plate a slightly sloping position and let the coating flow to the plate border and around. You can help with your fingers to wet the edges. If the surface is all wet, tip over the plate and let all coating flow over one edge back in your container. Give the rest of the coating on your plate the chance to distribute and put it down to dry it quickly.
I use my collotype-oven at 45 degree - a cold fan does it the same way.

Bevor doing the second praeparation brush your plate with hot water ! otherwise it doesn't work !

please clean your tools as far as the're wet.

.
2. printing layer top back next

This should bring a mechanical firm and an evenly distributed gelatine coating with well known thickness.
The part of the water can be modified to optimise your handling. A part of bichromat less 20% steepens the transmission characteristic. More bichromat is irrelevant.
This formula is the reduction to the necessary components of collotype based on my experience that this simple composition works in a perfect manner.
Any further additiv causes more faults than benefits.

The mechanical firmness of the gelatine coating is the result of the kind of it's treatment.
Building up macromolecule and cross-linking needs time, just as well giving them up. Every time you melt and jelly the gelatine you intensify the cross-links - drying the gelatine did the same.
The effect of this process is more dependable than using additives.

My standard-coating is 25gr gelatine on 1 square meter.
The quantity of the formula is good for 2 plates of 30x40cm.
formula
100 ccm
6 gr
1,2 gr
gelatine coating
distilled water
gelatine
kalium-bichromat

production:
Soaking the gelatine 1 - 2 hours in cold water. Mix down the bichromat.
Warm up to 65 -67 degree celsius ( microwave oven 500 watt 75 seconds for 100 gr ).
Stirring it up and leave it in the dark for 1 day ( max. 3 days ).

coating:
Heating collotype oven up to 40 degree celsius.
Brush the plate with the fixing coating under hot water.
If you have an oven with hot plate, it's good to improve the contact between plate and oven.
You can do an injection water with a shot along the border of your plate.
The slit between plate and oven will distribute the water unter the whole plate.
Now adjust the plate with a precise spirit level in all diections.
Melting the gelatine a second time and filtering it with a wet coffee-filter.
Now darkness with yellow light
Pour the gelatine without vesicating in the middle of the plate and distribute it quick.
( pipesmokers use a bent pipecleaner )
The plateborder has to be wetting several times.
Close the oven-cover and heat up your oven to 55 degrees celsius - about 1 hour for drying.

Plattenofen

The description is written on behalf my temperature-controlled collotype-oven with aluminium hot plate and a large-scaled woven fabric cover. This construction allows a quick evaporating of the water without making any whirl.

Lit 14 page 32
below 44 degree celsius no grain, 45 - 68 degree celsius fine grain ( right range ), above 81 degree celsius burnt up. plate well adjusted, no temperature-peaks > otherwise moire pattern.

!!! for your safety !!!
kalium bichromat ( K2 Cr2 O7 )
poisonous , do not touch , do not pulverize in a dry state , neutralisation with ammonia - simple washing doesn't help, for the chromate will stay in your skin (yellow colour), chromic acid more poisonous then the chromat !

.
Kaliumbichromate top back next
Unfortunately Kaliumbichromate is now vorbidden in EU - even for users of "micro"-quantities...
As substitute Diazidostilbene / "DAS" is possible. The colleague Michel Momal offers an worksheet and delivers little quantities.
I have got a description of an ferric salt process. The Chiba System - a work of Halvor Bjoerngaard at University CHIBA in Japan.
Unfortunately, my enquiries about copyright remained unanswered. But I think it is in the author's interest to pass on his work unabridged.
I have not yet worked with it myself.

.
exposure mechanism top back next
Kaliumdichromat is a chrom(VI)conjunction and contains chrom-ion in a positiv hexavalent state (Cr6+). In chase of the presence of a colloid (gelatine, glue, PVA) light will reduce it to chrom(III)conjunction oxidizing the colloid. The now existing profil of induration will be now influenced by the "darkness-reaction" caused by presence of reaction products.

.
suitable UV-lightsources top back next
lamps for printed circuit boards e.g. Nitraphot_BR - spot characteristic
UV-fluorescent tubes e.g. for a solarium or plants or xenonlamps - flat characteristic
The spectral constitution of the light have no influence to the transmission characteristic of the bichromat-gelatine - what counts is the uv-part of your lightsource.

lamps with spot characteristic will support the sharpness of your copie on the plate.
The quantity of light drops in coherence of the square-value of the distance. The border of the plate receives less light than it's middle area, which got the shorter distance to the light source. For a common negativ is made under the same circumstances during projection, it's negative process gives lighter sheet borders. That's why it does a compensation for your plate exposure, if the distance matches.
If the border of your print is too light, increase the distance of your exposure lamp.

The diffuse light of lamps with flat characteristic will prevent copying the sharp border of an additional mask during exposure. The drawing of the main-negativ will have sufficient sharpness, if you usually put the gelatine-layer of your negativ direct on your plates surface.

Doing plate exposure with additional masks I use uva-fluorescent tubes for solarium. They have a good visible part of light for my light-integrator. This device do light-measuring and counting the quantity during exposure time. For the lightoutput of a glow-discharge lamp is a function of its temperature. Doing the "cold"-start you'll get about 50% output and it takes about 10 minutes to reach "100%".
If you do your exposure only by time, warming up your tubes will make sence.

Xenon-lamps with their uniformly continuous spectrum of light will have no benefits for collotype, which can make me buying this expencive units.

.
your own exposure top back next
The bichromat gelatine do have a spectral sensivity between 350 - 450 nm.
A little yellow working-light (550-600 nm) is usefull. You can give yor normal room lightning for a short moment.

UVA Belichter

The light-quantity for my collotype-plates (D=0) is 14000 watt*sec/qm
This makes with my exposure-unit 12 uva-tubes each 40 watt with a distance of 10cm an exposure-time of 3 minutes.

For you it's much better, doing simple exposure-tests with your own light source.

For the high power with its short exposure make not perfect printing plates. Doing exposure-times of 30 minutes and more, the prints will be more balanced out than at shorter times.
That means, you need the work of the secondary reaction products. But they need time to be present.

In former times printers don't know this problem by long exposure-times at daylight.

Negativrahmen

For the plate-exposure a simple woodframe with a window-seal is useful. If you mount your negativ top down with adhesive tape in this frame, you can put the frame over the plate and let a vacuum-pump remove the air. So the air-pressure will held your negative down.

Be carefull - the gelatine-coating of your plate is hygroscopic - at 50% relative humidity it's possible to have a moisty plate. So your negativ will stick on your plate and destroy its surface. This will be seen by printing the plate. That's why I do exposure with "hand-warm" printing-plates.
Wet gelatine - glue on glue - it must be good to stick. "Glue" is a good general idea handeling gelatine.

!!! for your safety !!!
Working with open UVA-light sources makes eye-protection necessarry.
If you use green eye-glasses, you will not see red-lightened displays of tecnical units.

.
watering the plates top back next
Watering glue with a low melting-range at an according temperature makes it weak and its surface sticky. Cooling it down makes it stronger starting from the outside. Changing temperature more sudden you will have a good impact at the surface.
Puting the "hand-warm" plate into 4-6 degree celsius water, this temperature-shock will determine the surface characteristic. The importants of this first shock is to be shown by some first sprinkles - they will be clearly seen in your print.

This temperature-profil changes the structure of the gelatine-surface. The resulting grain after soaking the plate is finer than having none temperature-shock. The collotype-grain is the result of the in all directions upgrowing gelatine-volumen, which got no chance to splay in the flat of the glass-plate. Areas which are stronger to be tied on the glass where formed to "valleys". Other areas where driven to "hills" by the gelatine-volumen.

In consequence you'll find no grain in the light parts of the print, for the whole light area will rise without visible tensions.
Shadow-parts which have hardened the whole gelatine will stay dry and clear. This limit for exposure is good to be seen. You also will miss the humidity you need for a good ink-transfer.

The wet printing-plate shouldn't show any yellow parts.
After the first watering the gelatine's surface is very vulnerably.
Dear people with litho and etching expireince, please never wipe a collotype-plate instead of dabbing !
Please let the collotype-plate be dry in a perfect manner before using it. You'll get a strong gelatine surface for a lot of prints.

My whole watering-process depends on filling the cuvette 4 times and watering the plate 15 minutes each time. The first filling comes with "ice"-water 4 degrees celsius. The other got normal water temperature.
Doing so and thinking of a rest of 10% bichromat after each watering, The last bath will contain a rest of 0,01% bichromat. This reliable quality isn't possible with a continous stream of water in a big container. Although the poisonous substrate is lost in the waste water.

!!! for your safety !!!
Doing plate watering in a cuvette gives you the chance to collect an part of the poisonous chromat, because it will sink to the ground and is easily to be separated - environment will thank you !
The low order chrome after reaction is insoluble in water , but the noninvolved part stays in solution...
The idea of purifying the wash water by means of reverse osmosis arose in conversation with Mr. Lübbe.
An experimental set-up has confirmed this possibility in principle.
.
handeling the printing plates top back next
For during the most actions with a collotype-plate it's "the first touch" that counts.
If you use a cuvette for all manipulations, the plate can easily be plunged without any sprinkles and the whole surface is treated in the same manner. You'll got no dirty effects while printing such plate.
Cuvettes simplify the handeling, reduce the need of too much material, keep the material clean and refilling is easy to the stock-container.

Kuevette

My plate washing machine is based on an old windscreen wiper used in cars and works with a simple electrical controller without any further manual operation.

You need for a perfect watering of a 50x70cm plate 4x8 litre water.

!!! for your secutity !!!
Important for constructing cuvettes !
The hydrostatic pressure of a water-pillar depends only on its highs - not on the quantity of water! and the uprising force depends on the size of the area too.
You see 8 litres water in my upright cuvette with a size of 1 square meter exerts a force of 1 ton (1000kp)!
The steelcage is visible convoluted.
Even a wet film between the glasses would do the same.

.
to wet the plate top back next
Although clear water will evaporate in short time from your printing-plate, the traditional mixture of water and glycerin works well.
Glycerin as hygroscopic alcohol got a similar surface tension like water. So the ratio of the ingredients don't touch the property of the printing-plate.
The mixture prevents the plate from running dry, taking humidity from the air.
Giving the mixture a ratio of 1 part glycerin and 1 part destilled water, you'll have a stable behavior at a relative humidity of 50% in the air.
You can store the wet plates 1 or 2 days without watering again before printing.
The first watering should last for 30 minutes minimum. If the plate runs dry additional 10 minutes will do. There is no problem leaving the plate for hours in the mixture.

Having done this second watering you'll get a platte with a strong surface you can beat it with a bale of soft (kitchen) paper - but please, don't wipe!

If there's something wrong with your plate - put it for 1 hour in pure water, let dry it and do a new watering in your glycerin/water- mixture.

Kuevette

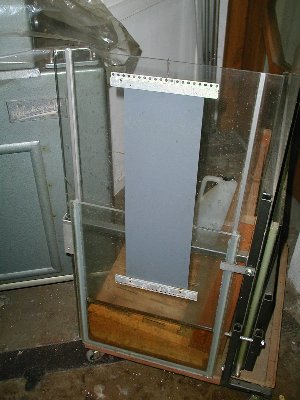
This little cuvette for platesize 30x40cm is done with 6mm glass and aluminium-profil fixed with common silicone glue. The simple slider makes handeling easy.

.
preparing the ink top back next
The most important feature of collotype-ink is, regardless of its consistence, its "tack". It's a "long" ink. You can pull magnificent long threads with your spatula.
The ink consistence is a question of printing-speed - the slower the speed the stonger the ink.

For the extreme strenght of collotype-ink you got historical reasons.
Even the "quick" stone-printing-machines have done a very low printing-speed. On the other hand people got no simple possibility to give an ink more strenght on a cold way. That's why Manufacturers sold the strongest ink, so everone can make it softer only by adding light oilbase.

In our days there's no original collotype-ink. The manufacturers Huber (Munich) and Maurit (Leipzig) don't produce it anymore.
But you can modify some inks to print your collotype today.

resolution for printers with experience
You can make a normal oilbased ink for copperplate-etching more stronger with the right "tack" by adding some resin. Please take resin in pieces, powder dosn't work it's oxidized. Melting the resin and mixing a little parts of ink till you're able to handel things when the mixture is cold.

Ink for lithography got a good strenght, but a bad "tack". It's too "short". A modification is difficult and a little frustrating.
The oilbase for beatgold seems to have a good strenght, but will give a toning ink - no clear prints at all.
Talcum powder can be used for some quick first tests.
One kind of light oilbase to soften your ink will do.

a solution from waterless offset
Note - historical "glue"-rollers will be destroyed by this ink !

The printing ink for waterless offset had to be a little more stiff than the ink for the usual offset process, because of his silicon-coating. To change any normal offset-ink into a waterless-one there are additives on market e.g. "Printon" from Griso Chemie AG CH-6343 Rotkreuz (Switzerland).
This additives are convenient for collotype.
1-3% of such ingredient makes the ink slowly stiff - after about 15 minutes it's ready for collotype. The change works slower during time, it don't stop.
Even an old collotype-ink changes during printing I use this behavior adding a little quantity of fresh ink from time to time to get a constant output. If you measure the transmission characteristic via a densitometer, you clearly see the ink condition.
Unfortunately many offset-inks on the market don't like the high quantity of water in the collotype-plate - their pigments do "bleeding" out causing an evenly distributed film. To stop this fault could be difficult, for the most modern offset-inks are not classic oil-based. It's often better to try another ink.
On the german market (I've tried them all) the most suitable ink is the serie "Resilith" from Hartmann (sun chemical).

!!! for your safety !!!
A microwave oven is suitable for heating oil-based ink or melting resin, for the mass is warmed up in a evenly distributed manner (maxwell current in dielectric material). Metal makes a short circuit, gives big heat and damage your unit.
This principle got no temperature limit ! Too much power to a little mass could make an explosion ! You easily exeed the flash point of ink, wood and plastic and you will get a nice fire in your oven !! Quicksilver- and alcohol-thermometer will explode too.
Some modern inks will have sudden changings even below 300 degree celsius.
If there's an unexspected action in your microwave oven, stop the unit and do not open. No explosion in mind but having to kill a fire, leave your glass in the oven simply cover it with a sheet of material.
Wearing gloves is an good idea and please stay calm.

In orderto prevent this events, you should give short heating-times and testing the condition of your mass outside of your microwave unit.

.
printing top back next
Printing a collotype is an ordinary thing. The condition of your ink is the object of your main interest. For electrical ink-rollers are changing the conditon of your ink in less time - turn them of while not doing prints.
The thickness of the ink-film on your ink-roller for a strength ink to print highlights and midtones should be 5-8 micrometer. Printing the shadows with softer condition you can use 14-18 micrometer - more ink will start daubing.

calculating the ink-film:

whole ink-roller surface x ink-film = quantity of ink

The ink-rollers of my Graphix blockletter-machine have 1 square meter surface size, that means to me 5gr ink. Preparing 10 gr of ink is good for all additional actions.

A good printing ink give a specific crackling sound by moving the ink-rollers. If you never heard it before (as I did), it's good to mix your ink step by step with a light oilbase. The sound appears sudden in a clear way.

The wet printing-plate should be visible dry. For dabbing it, use a lint-free (kitchen) paper.

The cover of your printing-cylinder short be hard. But on a machine without an adjustable seating it could be wise starting with a thick soft cover to see how the pressure is distributed on your plate's surface, to get hints for further adjustments.
Destroyed gelatine-coating and broken glass belong to every collotype start.
( You easily remove little splinters with a piece of adhesive tape )

The first 3-5 prints will get too much water showing a light gray-tone all over. This will disappear by proceeding.

Is the printing-plate adjusted, you can use a harder cylinder-cover.

Printing your first collotype-plates you will use different conditions of ink find the "right"one.
If you didn`t succeed, make another exposure-test with a visible gray-scale to get hints for the right range.
Collotype-plates which gives prints only with "tricky" treatment are a simple waste of time.
A new plate will give you better information, about how to do things right.

The only "special" treatment I use when room-temperature comes up to 25 degree celsius is a selective hardening of the highlights / midtones protecting the shadows by a well inked printing-plate.
Adding to the normal glycerin / water mixture 1-5% formalin - leaving the plate for 10-20 minutes.
After printing You have wash the plate in pure water, otherwise the formalin will proceed working.

!!! for your safety !!!
Formalin is acridly giving formaldehyde in the air. This causes cancer. Don't inhale this gas and keep your stock well closed.

Using the usual glycerin / water mixture you can store your wet plates for weeks without having any disadvantage. Storing the dry plates they will become harder and you can't reach their prior behavior.

.
hints for the paper top back next
Choosing paper for collotype it's good to rememer the item "glue".
The quantity and the kind of glue in a paper is important. The more glue is at the papers surface the sooner it stick on your printing-plate.

For testprint I use normal offset / copy paper.
Paper or carton wich have a smooth surface by running trough a calender will give attractive prints.
Handmade pape for lithography or etchings do work well, if their surface is not to rough. Otherwise you will miss the sharpness in your print.

Modern coated paper for printing pictures must be tested, for the manufacturer don't give information about his coating.

.
epilogue top back next
The first and simple reason to do collotype today is, printing "highend"-quality with simple equipment and doing it in an independent way without the "build in" limits of todays "soho"-equipment.
the correct reproduction of highlights - no other printing-process really can do.
( screen-points disappears - a 4 micrometer pixel on a square inch is no continious tone )
Your eye can difference highlights in an exceptional manner - try to find two papers with the same kind of white.
So todays prints having eroded highlights make people believe what perfect brillance the're looking at - a sign of destitution telling the truths.

You will not get the exceptional quality out of collotype-process in an easy way. You have to preserve the sharpness of details during each step of your work and the condition of your ink had to be perfect.
But to handel todays stochastic screens is not simple to get excellent results.

If I have to make a wish: please give todays inks more uv-resistant pigment to reach the durability of the historical collotype-prints.

Anyone is allowed to make private usage of this description under respect of my copyright.
Inquiries and feedback is welcome. email

Wuppertal, den 01.08.2017 Hartmut Voigt
.
collotype printers top back next
My thanks to following colleagues having good discussions.

Wolfgang Blauert
Holger Lübbe
Bessunger Straße 47 64285 Darmstadt
Germany
2013-2019 Offizin Darmstadt
Jean Malvaux S.A. Rue Delaunoy 69 B 1080 Bruxelles
Belgium
1986
Compagnie Francaise
des Arts Graphiques S.A.
18 rue de l'Arcade F 75006 Paris
France
1986 Victor Michel
Instituto Fotocromo Italiano Via Giuseppe La Farina 52 I 50132 Firenze
Italy
1980 Ing. V. Balocchi
Fa. Schreiber Hackstr. 77 Stuttgart
Germany
1984 collotype end
Klische: Herr Heinz Haefner
Druck: Herr Kind
Lucas Lichtdruck GmbH Kolumbusstr. 25 70771 Leinfelden Echterdingen
Germany
01.99 the end

.
still printing colleagues top back next
Gert Bertholdt
Berthof
Wriethstr. 28 21755 Hechthausen
Germany
Lichtdruck - Wien
Christine Binder-Ruff
Theodor Martini
Waldgasse 9 2371 Hinterbrühl
Austria
Centre for Fine Print Research
Faculty of Art / archive
University of the West
of England
Bower Ashton Campus
Kennel Lodge Road
off Clanage Road
Bristol BS3 2JT
Great Britain
Steve Hoskins MA (RCA) RE Director
Stephen.Hoskins @ uwe.ac.u
Paul Thirkell PhD Research Associate
The Katherine K. Herberger College of Fine Arts Arizona State University PO Box 871505 Tempe , AZ AZ 85287-1505 Professor James Hajicek
Herr Herbert Küster Am Kirchbrink 20 31542 Bad Nenndorf
Germany
doedel4@t-online.de
Leipziger
Lichtdruckwerkstatt
Nonnestr. 38 04229 Leipzig
Germany
Udo Scholz
Achim Müller
Mr. Michel Momal
phototypie.fr
La Buscalie Haute 12110 Aubin
France
Mark Morrill 1807 Elliot Ave. So #3 Minneapolis, USA
Minnesota 55404
artmarc@qwest.net
Museumswerkstatt im
Druckhaus Dresden GmbH
Andreas Kühn, Karl Seitz
Bärensteinerstr. 30 01277 Dresden
Germany
Dietmar Günther
Jürgen Sonntag
Thomas B. Werner Printmaking Studio Los Angeles
USA
belawer @ earthlink.net
Thomas, please update your e-mail
Artur Jonauskas visual Artist Russian Federation
.
Fratelli Alinari foto-archiv and collotype-atelier Florence
Italy
Benrido Collotype Atelier Kyoto
Japan

.
Material top back next
printing-plates glass sheet 4-6mm thick
corundum 240 grain
Vorpraeparation destilled water
sodium silicate
albumin
Ammonia
praeparation (photo)gelatine
Kalium-Bichromat
Druck ink
oilbase
glycerin
(formalin)

You will get things at your local market. For rare materials I got following sources:

panchromatic SW-film sheets:
Banse + Grohmann Ilsenburger Str. 40 D-38855 Wernigerrohde phone: +49 3943 / 5440 33
Filme: NP 15,22,27
Foma Bochemie Group Jana Krusinky 1604 50104 Hradec Kralove phone: +42 49 / 5 73 31 11
fax: 5 73 33 84
Fotoimpex Alte Schönhauser Str. 32b D-10119 Berlin fax: +49 30 / 28599083
foma filme
Lumiere Zum Köppchen 9 D-51674 Wiehl phone: +49 2262 / 70 16 66
fax: 70 16 68
Hans O. Mahn & Co.KG Brookstieg 4 D-22145 Stapelfeld phone: +49 40 / 23 70 08-0
fax: 23 35 77

gelatine
Gelita AG
formerly Stoess & Co GmbH
Uferstr. 7 D-69412 Eberbach / Baden
Gelatinefabrik vorm. Köpff & Söhne Salzstr. 67 7100 Heilbronn

ink
the problem collotype-ink and my links....

It seems that MITSUBOSHI PRINTING INK CO., LTD. (Japan) is the last producer of collotype-ink
They are so kind to start production from quantities of 1Kg. Please make your contact via e-mail.
See possible colours. If there are the process-colours yellow, magenta and cyan is unknown.

The collotypeprinter Mr. Michel Momal phototypie.net offers ink.

For the modification (see under "preparing the ink") there are:
the offset-ink Plakat-Skala of Epple (Switzerland) lightproof y6-7,m7,C8,k8 (German woolscala)
merchand Drucken und Lernen (Germany)

Oilbased ink for etching (with processcolours y,m,c,k) - available retail:
pegasusart - serie cranfield-traditional-etching-inks-oil-based
polymetaal (Netherlands) there are inks of Hanco (USA) und Hawthorn (UK)
Joop Stoop (France) keeps Charbonnel and his own brand Litho JoopStoop y6-7,m6-7,c8,k8

.
literature survey top back next
An good source not only for old books is archive.org
Also The Internatonal Society of Bromoilists ( a familiar process ) offers some books which could be interesting for collotype-printers.

Infos for photography at photographie.de, but the world market survey for bw-films is gone and there had been no answer for publishing it again .

Lit10, Lit14, Lit15 und Lit18 give a good historical survey.
Remember reading old books ! temperatur is usually given in degree reaumur!
100 degree celsius = 80 degree reaumur , zero the same

Lit 1 Kunstphotographische Edeldruckverfahren Heute
Frank Heidtmann, Berlin Verlag
Lit 2 Fachtheorie für alle Berufe der Druckindustrie
Eisenhut Leischner Rene, Gehlen Verlag
Lit 3 Tiefdruck und kleinere Druckverfahren
O.M. Lilien C.W. Gerhardt, Hiersemann Verlag
Lit 4 Bruckmann`s Handbuch der Drucktechnik
Erhardt D. Stiebner
Lit 5 Der Filmlichtdruck, ein neues Fettfarbenumdruckverfahren,
Otto Mente, Photographische Rundschau und Mitteilungen 1926 Nr. 63
Seite 51 55
Lit 6 Wodurch entsteht die Gelatinehärtung bei den Chromatverfahren ?
Dr. F. Schömmer wahrscheinlich Photographische Rundschau
Lit 7 Der Filmlichtdruck als Edelpositivverfahren
Max Bölling, Photographische Rundschau und Mitteilungen 1928 Nr. 65
S. 289 - 292, 375 - 377, 439 - 442
Lit 9 Die verschiedenen Methoden des Lichtdruckes geschichtlich,
August Albert, Halle/S 1900
Lit 10 Das Gesamtgebiet des Lichtdruckes und die Emailphotographie,
J. Husnik, 5. Aufl. Wien 1922 chemisch technische Bibliothek Nr. 22
Lit 11 Handbuch der modernen Reproduktionstechnik
2. Aufl. Bd. 2 Fritz Pfund 1924 Klimschs Graphische Bibliothek
Lit 13 Druckplattenherstellung im Lichtdruck
Werner, Poly Jahrbuch 1967 Frankfurt/M.
Lit 14 Der Lichtdruck an der Hand und Schnellpresse samt allen Nebenarbeiten,
August Albert, Enyklopädie der Photographie Nr. 32, 2. Aufl. 1906 Halle/S.
Lit 15 Handbuch über das Lichtdruck Verfahren
Julius Allgeyer, 2. Aufl. 1896 Leipzig
Lit 18 Der Lichtdruck und die Photolithographie
Julius Schnauss, 7. Aufl. 1906 Leipzig
Lit 19 Grundkenntnisse der Farbreproduktion
Tillmann Petersen, 1972 Stuttgart
Lit 20 Fette, Harze, Firnisse, Ruß, schwarze Farben
Eduard Valenta, 2. Aufl. 1925 Halle Verlag Wilhelm Knapp
Lit 21 Der Fettfarbenumdruck
Karl Sütterlin, Magdeburg
Lit 22 Die bunten Druckfarben
Eduard Valenta, 1914 Halle (Saale) Verlag Wilhelm Knapp
Lit 23 Die Harze, Kunstharze, Firnisse und Lacke
Dr. Hans Wolf, 1921 Sammlung G"schen
Lit 24 Heliogravüre
Willi Schuldes / Horst Sprang Verlag Otto Maier
Lit 25 moderne Verfahren für Reproduktion und Chemiegraphie
Ernst M. Schneider, Frankfurt Verlag Ullstein
Lit 26 Das Papier
Eduard Valenta, 1922 Halle (Saale) Verlag Wilhelm Knapp
Lit 27 Arbeitsblätter zur Farbenlehre
Gerhard Gairing, 1986 ISBN 3 88013 350 6 Verlag Beruf + Schule
2210 Itzehoe
Lit 28 Lithographie für Künstler
Kurt Lohwasser, 1980 ISBN 3 7625 1211 6 Bauverlag Berlin
Lit 29 Lehrbuch der Reproduktionstechnik
Rolf Ihme, 1984 ISBN 3 88013 203 8 Verlag Beruf + Schule 2210 Itzehoe
Lit 34 Lichtdruck
Dipl.Ing. Jürgen Passeyer Der Deutsche Drucker Nr.18 08.06.89
Lit 35 Untersuchungen von grenzflächenphysikalischen Eigenschaften
und deren Veränderungen an farb und wasserführenden Oberflächen
in Offsetmaschinen
J. Steidel, H. Urban, G.R. Joppien, G. Hübner, Chr. Hars
Institutsbericht 2/1988
Institut für Druckmaschinen und Druckverfahren
der Technischen Hochschule Darmstadt
Lit 38 Grundlagen der Verfahrenstechnik
Bernd Kögl, Franz Moser, Springer Verlag
Lit 39 Compendium der practischen Photographie, F. Schmidt
Verlag Otto Nemnich, Karlsruhe 1896
Lit 40 The Light Sensitivity of Carbon Tissue
Report Nr.8 Carbon Tissue Commission, ERA
H. Gerding, J.W. Ypenburg University of Amsterdam 1963
Lit 41 Grundlagen der Verfahrenstechnik für Ingenieure
Hans Dieter Bockhardt, Peter Güntzschel, Armin Poetschukat
VEB Deutscher Verlag der Grundstoffindustrie

.
my process parameters top back

Vorlagen
'pv.01
'pv.02
'pv.03
'pv.04
'pv.05
'pv.06
Vorlagennummer
Titel
Technik
Lichter
Kontrast
Datum der übernahme
Testform
'pt.01
'pt.02
'pt.03
'pt.04
'pt.05
'pt.06
Nummer
Datum
Typ
Art
Material
T1 - T24
Dichtewerte

Negativ
'pn.01
'pn.02
'pn.05
'pn.06
'pn.07
'pn.08
'pn.09
'pn.10
'pn.11
'pn.36
'pn.39
'pn.40
'pn.37
'pn.38
'pn.12
'pn.13
'pn.14
'pn.15
'pn.16
'pn.17
'pn.18
'pn.19
Nummer
Datum
Maskenummer
Funktion
Maßstab
Passerkennung
Prozessnr
Filmtyp
Emulsion
Lichter
Meßgerät
Anzeige
Kontrast der Vorlage
Bemerkung
Filter1
Belichtung Zeit1
Blende1
Filter2
Belichtung Zeit2
Blende2
Filter3
Belichtung Zeit3
'pn.20
'pn.21
'pn.03
'pn.04
'pn.22
'pn.23
'pn.24
'pn.25
'pn.26
'pn.27
'pn.28
'pn.29
'pn.30
'pn.31
'pn.32
'pn.33
'pn.34
'pn.35
X1 - X24
N1 - N24
R1 - R24
Farb1 - Farb8
Blende3
Entwickler
Verdünnung
Lager
Entw. Zeit
Temperatur
Schleier
Kontrast
Schwärze
gamma
Offset
Dichteabw
Ndichte
Vdichte
max Abw
min Abw
Korrelation
Bewegung
Vorlagenwerte
Negativdichten
Regressionsgeradenwerte
8 Farbenskala Küpper

Druckplatte
'pp.01
'pp.02
'pp.06
'pp.07
'pp.08
'pp.09
'pp.04
'pp.10
'pp.11
'pp.12
'pp.13
'pp.14
'pp.15
'pp.16


Platte
Herstellung
Versuch
Gelatine
Sorte
Menge
Chromtyp
Bichromat
Alaun
Schicht
Quellzeit
Q Temp
Schmelzen
S1 Temperatur
Reifezeit
R Temperatur
2.Schmelzen
S2 Temperatur
'pp.17
'pp.18
'pp.19
'pp.20
'pp.21

'pp.22
'pp.28
'pp.23
'pp.24
'pp.25
'pp.26

'pp.27

'pd.04
'pp.03
'pp.29
Praeparation
P Temp
Trocknen
T Temp
Dunkelzeit
Vorbel.Zeit
Bel.Zeit
Nachbel.Zeit
Beleuchtung
Du.Reakt
Waschzeit
W Temp
Trockenzeit
Lager
Bemerkung
Schattendichte
Schatten Dosis
Lichter Dosis

Druck
'pd.01
'pd.35
'pd.02


'pd.09
'pd.10
'pd.11
'pd.12
'pd.13
'pd.14


'pd.15
'pd.16
'pd.17
'pd.18
'pd.19
'pd.05
'pd.20

'pd.21
Druck
Serie
Datum
Härtung
H Zeit
Glyzerin
Feuchtungs Art
F Datei
Klima Temp
rel.F.
Farbe
Feuchtzyklus
Fruhe
Firnisart
Firnis Menge
Farbstand
Walzentyp
W Hoehe
Färbezyklen pro Druck
Druckzyklen pro Druck
Druckgeschwindigkeit
Papier
'pd.22
'pd.24
'pd.25
'pd.26
'pd.27
'pd.28
'pd.29
'pd.30
'pd.31


'pd.03
'pd.06
'pd.07
Vorbereitungsart
Schleier
Kontrast
Schwaerze
Gamma
Offset
Korrel
Ndichte
Ddichte
NDUmfang
MIDABW
MAXDABW
Feu-1
DRANZ-1
Ruhe1
DRANZ1
Ruhe2
D1-D24
Dichteabfall pro Druck
Farbverreibezeit pro Druck
Farbtrocknung pro Druck

Auswertung
'aA.01
'pd.01
'pd.35
'pd.36
'aA.02
'aA.03
'aA.04
'aA.05
'aA.06
'aA.07
'aA.08
'aA.09
'aA.10
'aA.11
'aA.12
'aA.13
'aA.14
'aA.15
'aA.16
'aA.17
'aA.18
'aA.19
'aA.20
'aA.21
'aA.22
'aA.23
'aA.24
'aA.25
'aA.26
'aA.27
'aA.28
'aA.29
'aA.30
'aA.31
'aA.32
Datum
Drucknummer
Seriennummer
Druckanzahl / Serie
den variierten Parameter
maximaler Schleier
mittlerer Schleier
minimaler Schleier
maximaler Kontrast
mittlerer Kontrast
minimaler Kontrast
maximale Schwärze
mittlere Schwärze
minimale Schwärze
maximales Gamma
mittleres Gamma
minimales Gamma
maximaler Offset
mittlerer Offset
minimaler Offset
maximaler Korrelationsfaktor
mittlerer Korrelationsfaktor
minimaler Korrelationsfaktor
maximale Ndichte für Ddichte
mittlere Ndichte für Ddichte
minimale Ndichte für Ddichte
maximale Ddichte
mittlere Ddichte
minimale Ddichte
maximaler NDumfang
mittlerer NDumfang
minimaler NDumfang
sinnvoller Druckbereich
Vergleichs Kennwert zur Reproduzierbarkeit von Kennlinien
maximale Dichteabweichung eines Kennlinienfeldes

Feuchtungsbibliothek
'pv.01
'pt.01
'pn.01
'pp.01
'pp.22
'pd.32
'pd.33
'pd.34
'pd.35
'pd.36
'pd.37
'pd.38
'pd.39
n
'pD.01
Vorlagennummer
Testformnummer
Negativnummer
Plattennummer
Belichtungszeit
Auflage
Gesamtzeit der Feuchtungen
Gesamtanzahl der Feuchtungs Zyklen
Nummer des Feuchtungszyklus
Anzahl der Drucke dieser Serie
Ruhe vor dem Druck
Feuchtung
Ruhe
erreichte Druck Nr.
Abtropfzeit der gefeuchteten Druckplatten

Druckbeurteilung
'pd.24
'pd.26
'ed.3
'pd.23
'pd.30
'pd.25
'ed.7
'ed.8
'ed.9
'ed.10
'ea.1
'ea.2
'ea.3
'ea.4
Kontrast des Drucks
Gamma des Drucks
Linearit"t der Druckkennlinie
Belegung des Druckrandes
Lichter
Schatten
Korn
Schärfe der Abbildung
Auflösung in Strichen pro cm
Bildruhe
Anzahl der Drucke pro Feuchtung
Anzahl der gleichmäßigen Drucke pro Arbeitszyklus
Gesamtauflage der Platte
Kleben des Papiers an der Druckform

14. scriptrevision 21.05.2023 - copyright - web'Galerie Voigt Edition
craftmanship blockletter printing collotype lithography gallery home

16980 visitors since 01.03.2006